The key to success when installing CCS Coatings and Sealers, is to achieve a good bond between the substrate and the underlayment being used. Correct preparation of the substrate surface is critical in achieving an excellent bond. Irrespective of what the underlayment is for, it will only be as strong as the surface to which it is bonded.
Methods required to properly prepare any floor can and will vary depending on the nature of the substrate. In some instances, multiple methods of treatment may be required to achieve the desired result. The factors which often dictate this will be the size of the job, the age and nature of it, and if applicable, the cost constraints being placed on the applicator.
The information contained in this Technical Bulletin is a recommendation on what to do and is not to be considered as a complete guide.
General information
Concrete floors must be sound, clean and free of oil, grease, wax, dirt, asphalt, curing compounds, latex, gypsum compounds, dust, oxides, paint (including mark-up paint), protective coatings, old adhesive or any contaminant which might act as a bond breaker. Concrete must be free from laitance, efflorescence and not be subject to hydrostatic pressure. Mechanically prepare the floor using recommended preparation methods such as shot blasting, scarifying, diamond grinding, or other suitable methods to provide a roughened, clean, sound, solid and open porous surface. Refer to the Surface Preparation guidelines in this document. Acid etching is not a suitable method of preparing the subfloor. Remove all dust and debris from the floor by vacuuming the surface with a suitable industrial cleaner – refer to Dust Removal further on in this bulletin for specific details.
All concrete sub floors must be fully cured and dry in accordance with “AS 1884-Floor Coverings – Resilient sheet and tiles – Installation practices”:
Section 3.1.2 New Concrete subfloors
(b) Dryness – the resilient covering shall be laid on a new concrete subfloor only after the concrete has cured and dried sufficiently as indicated by the test procedures described in Appendix A
Appendix A Testing for Moisture Content in Subfloors
Section A3.1.2 Relative humidity in-situ probe test
A concrete subfloor shall be considered sufficiently dry when measurements taken in accordance with ASTM F2170 do not exceed 75% relative humidity.
Ambient temperature, surfaces and materials should be maintained at temperatures higher than 10°C and below 35°C. For floors with a high humidity content or subject to rising damp, apply CROSflow® Moisture Vapour Barrier.
- New Concrete
All new concrete subfloors should be allowed to cure for a minimum of 28 days. This is to allow the slab sufficient time to dry and undergo shrinkage before the installation of any floor levellers. “AS 1884-Floor Coverings – Resilient sheet and tiles – Installation practices” provides guidance on the desired surface finish, as referenced below:
Section 3.1.2 New concrete subfloors
(c) Surface – New concrete subfloors on which floor preparation materials, and the resilient covering are to be laid without underlay, shall be finished to a smooth and porous surface. Burnished concrete surfaces, waterproofing additives, curing compounds and other types of treatments or coatings will adversely affect the adhesion of the floor preparation and resilient covering to subfloor and shall be removed by mechanical treatment methods. Concrete surface physical defects which also compromise adhesion of flooring systems, such as laitance or rain damage to the concrete surface, shall also be removed by mechanical preparation methods. Concrete surface physical defects which also compromise adhesion of flooring systems, such as laitance or rain damage to the concrete surface, shall also be removed by mechanical preparation methods.
- Curing Compounds & Coatings
Many new concrete slabs will have a curing compound applied over it, to improve the cured properties of the slab. They accomplish this by slowing down the moisture loss during curing and drying. These will act as a bond breaker and inhibit the adhesion of any subsequent floor coating, and they must be removed by mechanical preparation methods.
Older slabs may have protective coatings on them, such as sealers (eg acrylic, silane and others) or paints (eg epoxy, urethane, acrylic and others), which have been applied to improve the aesthetic appearance of the concrete. All these products must be completely removed from the slab, prior to application of any subsequent floor coating, as the nature and condition of the coating cannot be guaranteed. They must be removed by mechanical preparation methods.
- Burnished and Densified Concrete Surfaces
Burnished and densified concrete finishes have a significantly reduced porosity on the surface. These do not allow water to wet out or penetrate, so will act as a bond breaker and inhibit the adhesion of any subsequent floor coating, and they must be removed by mechanical preparation methods.
- Weak and Friable Surfaces
Any weak and friable finish on the concrete is unsuitable for any subsequent floor coating, as they mechanically unstable, and will have a very high chance of the floor installation failing. This can occur due to exposure to rain, extremely low temperatures (frozen or frost damage) or by being overworked, resulting in laitance. If the floor has any signs of spalling, scaling, crumbling or delamination it is also unsuitable. These floors must be prepared by mechanical preparation methods, prior to the application of any subsequent floor coatings.
- Contaminated Concrete Surfaces
Concrete floors must be sound, clean and free of oil, grease, wax, dirt, asphalt, tar based compounds, curing compounds, latex, gypsum compounds, dust, oxides, paint (including mark-up paint), protective coatings, old adhesive or any contaminant which might act as a bond breaker. Failure to remove such contaminants can result in flooring failures due to debonding.
Some chemical methods may be successful in removing contaminants such as grease, oil and wax, but this is heavily dependent on whether the level of penetration is deep. Some chemical methods, including solvent removal, can act to drive the contamination even deeper.
To remove any doubt, it is recommended that all surface contamination be removed by mechanical preparation methods, down to clean, sound, solid concrete prior to the application of any subsequent floor coatings.
- Old Adhesive Residue
This is a very common surface contaminant, especially with renovation and rectification projects. There are many installers who will be encouraged to apply a topping over the old adhesive, to act as a primer. However, you are relying completely on the level of adhesion to the background substrate, and the integrity of the old adhesive itself – this is putting the integrity of the complete flooring installation at risk.
To remove any doubt, it is recommended that all old adhesive be removed by mechanical preparation methods, down to clean, sound, solid concrete prior to the application of any subsequent floor coatings.
- Lightweight Concrete
Typically, lightweight floor panels are used for applications where reductions in dead loads are required, and for thermal and sound insulation. They can propose a problem with adhesion, as the nature of the surface can vary between the different types, and it is often weak and friable. As a result, it is highly recommended that before undertaking any application of subsequent floor coatings, that a test area be conducted. We suggest contacting ACS Technical Services for advice, prior to installation.
- Cracks & Expansion Joints
All cracks in concrete must be prepared in such a way as to prevent the crack from transferring into the surface finish of the floor coating. In the case of small hairline cracks, which are not live, they pose little threat, and will be covered by the coating. Larger cracks, which are also not live, should be patched with a shrinkage compensated grout. The crack should be opened up to a suitable width using a V-Groove router bit, cleaned and vacuumed, then wet down with clean potable water prior being patched.
If the crack is live or active, the source of the defect needs to be investigated, by a suitably qualified structural engineer prior to undertaking any work. Once the nature of the crack is identified, a suitable structural repair system should be recommended to repair it.
Expansion joints in the background structure must always be maintained and carried through to the surface of the subsequent floor covering – they should never be covered over.
Surface preparation
This is by far, the most important part of any flooring installation job. If the surface is poorly prepared, the installation will most surely fail. To quote the famous words of Benjamin Franklin, “If you fail to prepare, you are preparing to fail”.
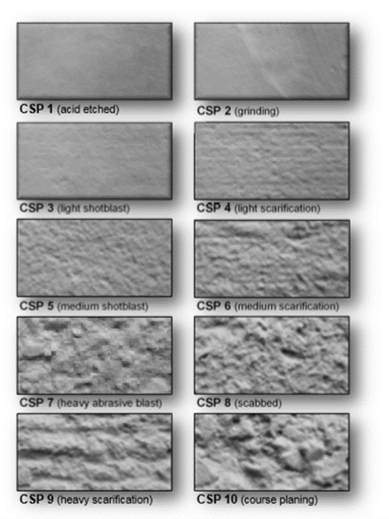
As detailed above, the best way to prepare a concrete surface, is by mechanical preparation methods. The aim of mechanical preparation is to prepare the concrete, such that it has an open porous surface profile, which will be accepting of any subsequent floor coatings. The surface should be prepared to a designated Concrete Surface Profile (CSP), as outlined in the International Concrete Repair Institute (ICRI) Standard No 310.2 “Selecting and Specifying Concrete Surface Profiles for Sealers, Coatings, Polymer Overlays and Concrete repair with CSP Chips”. These Concrete Surface Profiles are divided into ten classifications (CSP 1-10) of surface textures based on the average distance from the peaks of the surface to the valleys. They are accepted industry standards to help guide the installer achieve the proper texture for successful bonding of the overlay or coating. The lower number profiles are smoother (CSP 1 is nearly flat), and the higher numbers have more “tooth” and get progressively rougher.
As a guide, the following floor covering types will require the indicated level of surface preparation. This is a guide only, and ultimately, the decision must be made on a case by case basis.
| Floor Covering | Surface Preparation Guide |
| Sealers | CSP 1 |
| Thin Films | CSP 2-3 |
| High Build Coatings | CSP 3-4 |
| Self-Levelling Underlays | CSP 2-6 |
| Construction Grouts | CSP 3-5 |
| Polymer Overlays | CSP 5-9 |
| Concrete Overlays and Repair Materials | CSP 5-10 |
Mechanical Preparation Methods
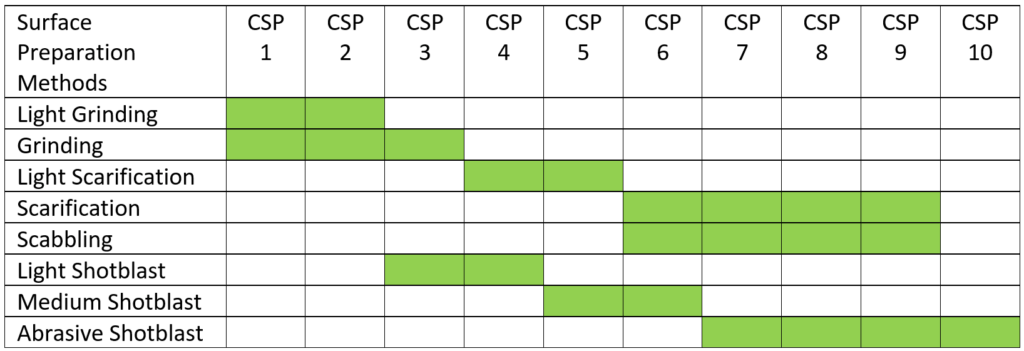
- Grinding uses diamond segments on a rotating disc to grind, level, smooth, clean, or texture the top surface of a concrete slab. (CSP 1-3)
- Scabbling uses compressed air to hammer piston-mounted pieces that vibrate in and out to remove product from a concrete surface. (CSP 6-9)
- Scarifying uses Tungsten or hardened steel flails to strike the surface over and over and facilitate high-speed removal of concrete and coatings. (CSP 4-9)
- Shot Blasting is a dust-free method of abrasion where hundreds/thousands of steel shot particles race out of the machine, propelled by the motor to remove the top layer before bouncing back into the shot blasting system to be used again. The steel shot (garnet) profiles the surface. (CSP 3-10)
Note: Acid etching has been used as a means of cleaning concrete surfaces for some years now. It is a process which is not always easy to control, and in most cases, does not effectively remove any contaminants which impregnate the surface. This is not a method which is recommended.
The following table gives a guide as to the type of mechanical preparation required to achieve a certain CSP.
OH&S compliance
The presence of respirable silica on any worksite is a major concern. During the process of surface preparation, respirable silica can be generated, depending on the nature of the preparation method. At all times, the installer must ensure they wear proper breathing PPE, which requires use of the correct face mask. For specifications on the right masks, refer to the following standards:
- AS/NZS 1716:2012 Respiratory protective devices, and
- AS/NZS 1715:2009 Selection, use and maintenance of respiratory protective equipment
It is of prime importance to ensure all equipment used has captive dust collection, with an M Class (utilising a Hepa filter) or a H Class filtration system being essential. For specifications on commercial vacuums, refer to AS/NZS 60335.2.69:2017 Household and similar electrical appliances.
The use of safety glasses or goggles, hand protection, hearing protection, steel capped boots, hi vis long sleeves and pants as well as a suitable hard hat is a requirement on any job site. For more detailed information, refer to the Safety Data Sheet for the individual ACS products or CCS products.
Dust removal
Once the surface has been prepared to the desired level, all traces of dust must be removed. Refer to above comments regarding the presence of respirable silica. Sweeping is not a suitable means of removing fine dust from the floor, as the dust remains in the fine pores of the prepared concrete surface, and significantly limits penetration and adhesion. Blowing with compressed air is also not a suitable means of cleaning the floor, as it forces respirable particles to become airborne, and more hazardous. The only way to effectively remove fine dust from the floor, is to vacuum it, using an M Class cleaner (utilising a Hepa filter) or a H Class cleaner. For specifications on commercial vacuums, refer to AS/NZS 60335.2.69:2017 Household and similar electrical appliances. Not only is this a key to the effective preparation of the floor but is a highly important OH&S aspect of the installation process.
Priming
The surface of a properly prepared concrete substrate is porous. Achieving good adhesion requires maximum contact surface area. The use of a primer is an important part of any flooring installation. It must provide a fundamental key to the surface by providing penetration and good adhesion, and it must have strength or cohesion, so it provides an integral bond layer between the substrate and the coating. The best means of priming can be found in the individual ACS technical data sheets and CCS technical data sheets, and in the data sheet for CCS Super Polymer.
Testing
Whilst we have presented an extensive overview in this document, it is impossible to consider every possible combination of conditions that may be found in an application – from substrate condition to environmental conditions. This document is a guideline only, and if there is any uncertainty, we highly recommend calling your ACS representative or ACS Technical Services on 1800 077 744. It is always a very good principle to undertake a test area on any job, prior to the job being fully engaged. This allows the installer to gauge the effectiveness of the preparation and application methods being used.
ACS Technical Services offer an extensive testing protocol in its laboratory, for any application our products are used for. We are always willing to undertake in laboratory based or onsite testing to assist the installer in coming up with the correct methods of installing ACS and CCS products.
Important notice:
All Safety Data Sheet’s (SDS) are available from the ACS and CCS websites. Please read the SDS carefully prior to using this product. In an emergency, contact any Poisons Information Centre (phone 13 11 26 within Australia).
Product disclaimer:
Recommendations and advice regarding the information provided in this Technical Bulletin are to be taken as a guide only and are not intended to be interpreted as a general specification. Due to the variable nature of every single project, it is not possible to cover all conditions found in an application. The information contained herein is to the best of our knowledge, true and accurate. We reserve the right to update information without prior notice. No warranty is implied or given to its completeness or accuracy in describing the performance or suitability of the product for a particular application.
